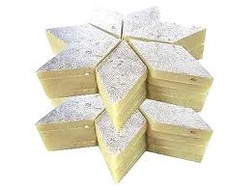
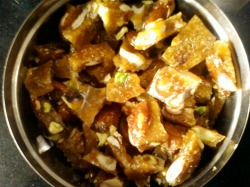
Rajasthani Churma
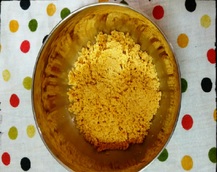
Rajasthani Churma
Extremely simple to make and a delicious sweet dish (or a side dish), it can be made in advance and stored in an airtight container at least for 2-3 weeks.
Ingredients:
5 cups coarsely ground wheat flour
1 cup clarified butter
1 tsp salt
1 tsp baking powder
1 cup water or more to knead a stiff dough
1 tbsp clarified butter to brush the baatis
Method:
1. Preheat the oven on 200 degrees celsius.
2. Mix the flour, butter, salt, baking powder and add enough water to knead a stiff dough*.
3. Make small cookie sized dough balls, press them to flatten the balls and brush the tops of the baatis with little butter.
4. Cook these baatis in the pre heated oven at 200 degrees celsius for 15-20 minutes or till both the sides look light brown in color*.
*Tips:
1. Add water in small quantities at first when kneading the dough so that the dough's texture keeps in control or even if the dough becomes too loose, add some more flour to it.
2. Each oven is different, if your oven cooks faster and even in 15 minutes and you see a brown color, take them out instantly, if you dont see the color even after 20 minutes then u need to cook them for some more time, it can take even upto 40 minutes in some ovens.
Caramel Custard
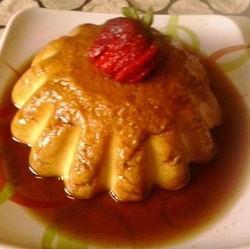
This is a very simple dish if u follow the steps well, and makes you proud of yourself when it turns out perfect. This recipe works well for me but if u r using a different brand of milk or custard powder u might need to make adjustments accordingly.
Ingredients for the Custard:
1/2 litre toned Milk + 1/2 cup Milk to dissolve the custard powder
3 tbsp Custard Powder(Your choice of flavor, i used vanilla)
4 tbsp Sugar
2 tbsp Unsalted Butter or ghee
Ingredients for the Caramel:
1/2 cup Sugar
1 tsp Water
Method:
1. Boil the 1/2 litre milk with the sugar, turn off the heat when the sugar is dissolved and milk is boiling.
2. Dissolve the custard powder in the extra 1/2 cup of milk. Slowly add in a stream to the hot milk simultaneously stirring with other hand.
3. Turn the heat on and Continue stirring continuously till the mixture thickens, total cooking time should not be more than 3-5 minutes.
4. Turn off the heat and add the butter to the custard and mix vigorously.
5. Take the metal mould that you are using for the custard, place it on low flame and add the sugar and water for the caramel in the mould
and cook till the sugar dissolves, do not stir the sugar.
6. Turn the heat off after 2-3 minutes or when u see the sugar turn into a golden amber color.
7. If u dont have a metal mould and are using a silicon mould or any other mould, do the above procedure in a separate pan, let it cool just a little
bit and then add to your mold.
8. Pour the custard on top of the caramel in the mould, fill upto the top, leave it like that till it cools a bit then place in the refrigerator for 4-5 hours.
9. Once the custard seems firm take a plate, place it on top of the mould and flip it just like u flip a cake. Serve with fresh or dried fruits.
Tips:
1. Continuous stirring of the custard is very important otherwise it'll burn at the bottom and give an unpleasant taste later.
2. You need to do the steps as fast as possible, since custard sets pretty quickly and caramel burns quite easily.
3. Its better to use a metal mold since u can heat it directly to make caramel. u can also use your metal cake molds for this purpose.
Moong Dal Halwa
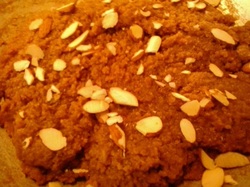
This is the most time consuming dessert i have made so far, ok there are some more too but i just wanted to let u know in advance, that u need a lot of patience and a strong set of biceps to keep stirring for 40 minutes or so, no no, dont look for any other simple recipe coz this baby is all worth the effort and time spent, it doesnt involve too much ingredients just everyday pantry stuff so it can be a real life saver when unexpected guests arrive and u dont have the time to run to the market to get sweets, this can keep cooking on the back burner when you are preparing the rest of the meal.. enough talking now lets start cooking...
Ingredients:
2 cups Yellow Moong Dal or husked split green gram
2 cups Sakhar or Sugar
2 cups Milk
2 cups Ghee or Clarified Butter
1 cup Water
50gm or 1 medium packet Milk Powder(What i used but see tips)
2 tbsp chopped Almonds or Cashews
1 tsp Elaichi or Cardamom Powder
Tips:
1. 1/2 cup Khoya or Cream can also be used instead of the milk powder but thats what was available with me so i used that and its Optional.
2. I used brown sugar but you can also use white sugar or gur or jaggery as well.
3. My halwa turned out a little dry so i heated it lightly before serving , if u feel its still dry then try adding some milk a tbsp or so for a cup.
3. Keep stirring the dal continuosly for best results, try using your left hand in between :D.
Method:
1. Soak the dal in enough water for about 2 to 3 hours, discard the water and grind in the mixer with very little or no water, to a course texture.
2. Take the Ghee in a Kadhai or any thick bottom pan like a wok, pour the ground dal mixture in it and keep stirring on medium heat, make sure nothing sticks to the bottom of the pan.
3. Keep scraping the sides and the bottom to prevent anything from sticking or burning, Add more ghee if u see the mixture is too dry and difficult to work with, i added about 2tbsp more ghee at this step.
4. On the other burner, in another pan, mix sugar and water and boil for about 15 minutes, in the mean time keep stirring the dal, total time required by the dal is about 30 minutes but its well worth it.
5. Once the dal looks dry and looks like bread crumbs, the dal must have changed its color now, a bit darker than before, reduce the heat to low.
6. Add the milk powder, mix and immediately add milk and mix well for about 1 minute and add the sugar syrup again mix well till the mixture dries up.
7. Add the elaichi powder, almonds and turn the heat off, serve warm. Keep in an airtight container in the fridge, keeps well for about a week, but i dont think its gonna last that long :D.
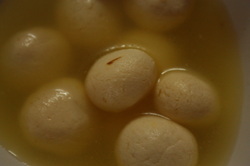
Kesari Rasgulla
Ingredients:
Makes 12
5 cups milk (i use double toned milk)
2 tablespoon lemon juice
1 1/2 cup sugar
4 1/2 cups water
10-12 strands kesar or saffron
Method:
1. Combine sugar and water in a pressure cooker(without the lid) and boil it stirring continuously on medium flame. Side by side work on step 2 as follows.
2. Boil milk in another pan, once it starts boiling, simmer the flame and add the lemon juice in three intervals, i mean, first add about 2 tsp, stir well, the milk will start curdling slightly by now, then after 2-3 minutes again add 2-3 tsp and repeat if the lemon juice is still left, turn off the heat, let it settle for 3-4 minutes then drain in a sieve or strainer and run through fresh tap cold water(Just to extract the sourness of the lemon juice added earlier) .
3. Tie it up in a muslin cloth or any thin handkerchief will also do, once tied on one end like chocolate wrapper, try to squeeze out all the water from this paneer, the more u squeeze the less chances of your rasgullas breaking in the sugar syrup.
4. Once all the water has been squeezed out, take the mixture in a plate and knead it with ur palms with firm pressure, just as u do it with atta while making rotis, once the mixture comes together and forms a big lump, divide it into 12 equal small balls, small because they will double up when placed in the sugar syrup.
5. By now the sugar syrup will be boiling and hot, turn off the heat, its ok even if the liquid is thin, it should be of 1 thread consistency. Add the Kesar and the paneer balls we just made into this syrup and turn on the heat again to medium, place the pressure cooker lid but without the whistle and instead of the whistle place a steel katori or cup facing upside down, i mean just covering the whistle hole with a katori. Boil for 7-8 minutes on medium flame.
6. Turn off the heat and let it settle for 5-10 minutes, then open the lid and transfer the rasgullas in a serving bowl and cool it in the refrigerator for 4-5 hours so that the rasgullas soak up the sugar syrup, or if you are too impatient or too happy with the output, thank me and go ahead and eat 'em all hahahaha......
Tips:
1. At first you will notice that there are small lumps in the mixture but as u keep kneading it for 4-5 minutes you will notice that the mixture comes together to form a big lump. If it doesnt, knead again.
2. Make sure there are no cracks in the paneer balls, if its still getting cracks then you have not kneaded it enough, knead again for some more minutes.
3. Some people also use a combination of cows milk and toned buffalow milk but using double toned buffalow milk gave me good results.
Kaju Katli or Kaju Burfi
This is an instant kaju katli that you can gift or serve to ur guests during the festive season especially diwali, very easy to make and delicious as usual
Ingredients:
5 cups Kaju or Cashewnut
2 cups Milk Powder
3 cups Sakhar or Sugar
1 cup Pani or Water
1/2 tsp Velchi or ilaichi or Cardamom Powder
1 tsp Ghee or Butter
Silver wark for decoration(Optional)
Method:
1. Grind the cashews in the grinder to a fine powder taking about 1 cup at a time.Do not add water while grinding.
2. Take water and sugar in a heavy bottom pan and cook on low flame for about 15-20 minutes, till the sugar syrup thickens and is about 2-3 thread consistency.
3. Once the sugar syrup is ready, turn off the heat and add milk powder to the syrup, mix well and immediately add the cashewnut powder and the cardamom powder, stir well and keep stirring till a big lump is formed, remember that the gas is off here.
4. Take a dish and grease it with the ghee, transfer the hot cashewnut mix on to this greased dish and spread evenly with a spoon or a rolling pin or belan, spread the silver wark on top and let it cool for an hour.
5. Cut it with a pizza cutter or a knife into desired shapes and again let it cool, once cooled transfer into an airtight container and store outside at room temperature, can stay well for about 1 week.
Chocolate Fudge Indian Ishtyle
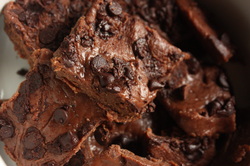
This is my accidental recipe which turned out to be an excellent chocolate fudge, i was just trying to set yoghurt one morning and it curdled, so i was just wondering what i can do with this curdled milk, usually we just add some sugar to it, discard the water from the white part or the paneer and consume it just like that, but i was bored of it and wanted to do something creative out of it, after all inventions do require experimentations, oh that was a good line anyways so here are the ingredients:
11/2 cup Paneer Grated and then blended in the mixer for a few minutes
1 cup Sugar
1 cup Cocoa powder
2 cups Milk powder
1-2 tbsp Hershey's chocolate syrup(Optional, i just added it to get that rich brown colour)
1 tbsp Butter or Ghee
1/2 cup Chocolate Chips(Optional)
Method:
1. Blend the sugar in the mixer to powder, add the paneer and blend to mix together for a few seconds, take out the mixture in a kadhai or wok.Remember the heat is not turned on yet.
2. Add milk powder 1 cup, cocoa powder choc syrup and mix together, keep it like that for 5-10 minutes, if you see that the mixture is soft and sticky a bit, add the remaining 1 cup milk powder, mix well.
3. Turn the heat On now, and stir this mixture continuously on low heat and make sure it does not stick at the bottom of the pan, stir for about 5 minutes, add that 1 tbsp of butter or ghee but save just 1/2 tsp from it to grease the dish.
Mix well, now you will see that the mixture turns into a big lump and sticks to the spoon but leaves the pan, this the perfect fudge consistency, not too wet, not too dry, if your mixture is still very moist and sticky try stirring it for another 2-3 minutes.
4. Take a plate and grease it with the 1/2 tsp butter we had saved earlier, turn off the heat and pour this mix onto the greased plate and spread it evenly with the spoon, if the mixture is sticking too much to the spoon , use a buttered spatula or simply a thin and clean polythin bag coated with a drop of butter on one side, and press the mixture with this bag with the help of ur fingers, remember that the mixture will be hot, so plz dont burn your hands, be careful while pressing the mixture, after 2 minutes, spread the chocolate chips onto this mixture and press lightly.
5. Tadddaaaaa its done, let it cool at room temperature then cut it into desired shapes and keep it in the fridge for 5 minutes, so that the crust dries a bit, take it out take the pieces out with the help of a knife, sliding the knife carefully in between the plate and the bottom of the fudge, transfer them to an airtight container and store it in the fridge. dont ask me how many days it stays in the fridge coz i did not even get to keep it in the fridge, mine vanished from the plate itself, thankgod i clicked a picture beforehand :)).
Tip:
If even after cooling, ur fudge is not coming out in proper pieces, it must be too sticky, dont worry, just take out a little quantity in your hands and roll it into small chocolate balls, use a few drops of butter as lubricant if required, tasty and fun to eat.
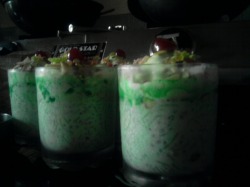
Pista Falooda
Ingredients:
1.5 ltr Milk
2 tbsp Sabja, if u dnt like it then reduce the quantity or dnt use it at all
3 tbsp Vermicelli or Sevaiyan
1 cup Sugar or adjust according to taste
1 tbsp Cornflour dissolved in 1cup milk
A few drops green colour to get pista colour
For Serving:
Coloured cherry or papaya cherry that we use in banarasi paan, if u still dnt get it forget it.
Pistachios slivered(can also be soaked in lukewarm water and then cover removed to get a fresh green colour)
Almond slivered
Khus sharbat, thats what i had, good if u can get green coloured pista sharbat somewhere
Few scoops of Pista Icecream
Method:
1. Take a thick bottom pan preferably of aluminium or non stick curry pan that can easily accomodate about 2ltr of milk, we are not using 2 ltrs milk but this is just to
indicate that there should be enough empty space in the pan to stir the mixture easily, anyways.... Boil the 1ltr milk in this pan till it starts boiling vigorously and is reduced a bit to approx 1ltr. Now dont try to measure it again u can guess it by the initial and current level of the milk. Stir occasionally.
2. Reduce the heat to low and add sabja, vermicelli and sugar to it,stirring continuously boil for 5-6 minutes or till u see the sabja go transparent and get wheatish and
bubbly or if not using sabja just see it the vermicelli is cooked well.
3. Now add the cornflour that was dissolved in milk, boil on low flame stirring continuously. take a short break if ur hand is paining by now.
4. Add the green colour after two minutes, 2-3 drops at max, make sure u dnt add too much coz we want pista colour and not palak paneer colour.
5. After 4-5 minutes you'll see the mix a bit thicker then turn off the heat and let it cool, dnt put in the fridge immediately and dnt even cover it completely, though u can
cover it partially.
6. Once it has cooled outside, u can put it in the fridge, and cool for about 1-2 hours.
7. For serving, put the khus sharbat at the bottom of the glass, put in the falooda mixture to fill about 3/4th of the glass, now top it with 1 scoop of Pista Icecream and all
those tiny bits of cherry or coloured sugar, pistachios, almonds or just a frozen drop of khus sharbat.
Serve Chilled.
Sitafal Ice cream at home
I am so proud of this recipe, i actually tried it just to see if its possible to make ice cream from scratch, that too by eliminating the cream, i know it sounds strange but i wanted to reduce the calories in the ice cream without loosing the creamy feel of it, so here i am with a recipe to prepare ice cream at home without using any chemicals or stabilizers.
The ingredients you need are:
Milk 1 litre + 1cup milk (to dissolve the cornflour)
Milk Powder 3cup
Cornflour 1cup
Custard Apple Crush 3cup(I used Mapro crush)
Method:
1. Dissolve cornflour with 1 cup milk and 1 cup milk powder.
2. Boil Milk in a pan, add the cornflour mix, stirring continuously. once the mixture gets thick, cook for abt 7-8 minutes then turn off the heat.
3. Stirring continuously for abt 3-4 minutes, add 1 cup of milk powder till it gets mixed properly in this hot mix and the steam inside the mix escapes mostly.
4. Let the mixture cool a bit (do not cover the pan here), will take abt half an hour, stir in between to avoid the creamy layer come on the top of the mix, its ok if the mixture is a bit lumpy, now put the mix in the refrigerator to set, will take abt 2-3 hrs.
5. Remove the mix from the freezer and blend it in a blender or mixer with the remaining 1 cup of milk powder to a puree, take it out on a flat bottom container, add the custard apple crush(The crush itself is very sweet so we havnt added any extra sugar to it yet).
6. Now leave it to set in the freezer by covering the container with a lid. Will take abt 2-3 hrs or more.
7. Now Enjoyyyyy!!!!!!!!!!!!!!!!!!
Eggless Chocolate Mousse
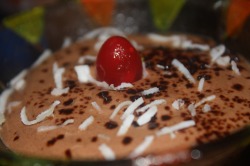
Easy to make instant chocolate mousse
Ingredients that u need are:
1 pack Amul fresh cream or 1 cup cream
2 tbsp powder sugar(you can also use sugar substitutes instead)
2 tbsp cocoa powder or drinking chocolate(use less sugar if using drinking chocolate)
1/2 cup chocolate chips if u get them, not necessary
1 tbsp milk powder
1 tsp vanilla essence
Method:
1. Freeze the mixing bowl and whisker in the freezer for 15-20 minutes.
2. First take the cold cream, add sugar and whisk together to form foam, if you are using automatic mixer, whisk on low speed coz u dnt want to extract butter out of it.
3. After a few minutes add the rest of the ingredients and Go on whisking it till the cream thickens and it becomes a bit hard to whisk it. As it gets foamier, start checking for a soft peak, which is what you want. The peak should bend over at the top when you remove the whisk.
4. TaDaaaaa its done, now serve it in bowls and decorate it with cherries, grated white chocolate or simple coconut scraping, cool it in the fridge for some time and then serve chilled.
Instant Kesari Kalakand

An instant version of the traditional dessert.
Makes about 16 pieces.
Ingredients
1 cup paneer grated, use fresh paneer for best result
8 tablespoons whole milk or skim milk powder
1/2 cup sugar
1 cup cream , amul fresh cream 1 pack or if u dnt have cream use 1 cup milk and some more milk powder instead.
1/2 teaspoon cardamom powder
8-10 strands kesar or saffron dissolved in 1 tbsp hot milk, if by accident u got the fake kesar from the market, dnt worry, just add a few drops of kesar essence and lemon yellow color.
For the garnish
2-3 almonds, handful of pistachios slivered
Method
1. Combine all the ingredients in a non-stick pan.
2. Cook over a medium-low flame, stirring continuously for approximately 15 to 20 minutes till the mixture thickens and leaves the sides of the pan.
3. Spread onto a dish. Cool and cut into pieces.
4. Garnish with slivered almonds and pistachios and serve chilled.
Caramelised Almonds
This recipe is really tasty, quick and what else do u want, its cooked in the same way u make ur caramel sauce, except u dnt have to add much cream here, and i made it with almonds u can throw in any dry fruits u have...
Ok so the Ingredients:
Almonds about 2 cups(roasted in the oven on high for 1-2 minutes preferred for an unbelievable taste), no need to cut or break them.
Sugar about 2 cups
Water 2 tbsp
Butter abt 2tbsp(salted or unsalted whichever is available)
Method:
1. Add the sugar and water in a pan, let it cook on medium or low flame stirring continuously till u get a light golden yellow or brown colored liquid in the pan, immediately add 1tbsp butter and the roasted almonds or any other dry fruits you've chosen. mix well and turn off the heat.
2. Grease a dish with the rest of the butter, pour this hot mix onto the greased plate, try to spread a little with the same spoon quickly, dont try to make a very thin layer, it might just stick to the spoon itself plus its ok even if its thick, except we'll call it an almond candy bar then.
3.Have some patience and let it cool, try and remove it by hand when the mix looks hard from the top but is a little hot when u touch the bottom of the plate, this is the right time to remove the mix from the plate, if its not coming out easily, carefully try loosening the corners with a knife at first. if you've greased the plate well, this shouldnt be a problem.
4. Break into small pieces by hand, and store it in an airtight container, survives even out of the fridge, its great to pop up a piece or two just roaming around in the house. and difficult to resist.
Mango Jam, Maushi's Recipe

Mango days are here again, ohhhhh i lllllllooooooovvvvvvvvvveeeeeeeeeee Mangoes, any shape, any size, they are so yummy and so juicy.... anyways, one recipe made out of mangoes that i just cannot control myself eating is my Aunt's Mango Jam, and guess what i tried her recipe the other day, and it came out simply fantastic and not to mention, YUMMMMMMYYYYYY..........
Ok so the ingredients that u need are:...
Mango pulp 1kg(include 3-4 alphanso mangoes for a richer taste)
Sugar 800gms
Citric Acid abt 1/2 small tsp, dissolved in a tsp of water...
Sodium Benzoate 1/4 small tsp, dissolved in a tsp of water...(available at any medical store) can eliminate also, its just a preservative..
Yellow Rich Color as per required(abt 1/4 tsp dissolved in a tsp of water)
Method:
Mix the mango pulp and sugar and heat them on medium flame stirring continuously for abt 15-20 minutes, now add the color, citric acid and again cook for 15-20 mins, check for the consistency, the mix should take a few seconds to fall from the spoon, which means its done, usually takes abt 30-35 minutes...
now turn off the heat and add Sodium Benzoate to it, mix well, fill the jam in sterilized glass jars when the jam is still hot, otherwise it wont fall and will set in the pan itself.. do not put the lid on...
now let the bottles cool to room temperature and now put the lid on and store them in the refrigerator...
you can also eliminate the preservative but then you'll have to keep the bottle in the freezer..
Enjoy Maadi...
